Thursday, December 27, 2012

Best Cakes of 2012

This is always a fun but difficult post for me. I find myself looking over the past year and it is so fun to see all the cakes that I have created. They bring back so many memories for me. Then I try to chose my favorites...and that is really hard. Every cake I make is special to me. I seriously put a small part of myself into all my creations. I LOVE making cakes. And I am so grateful to my customers for choosing to use me for their cakes and allowing me to continue doing what I love. So with that said here are some of my favorite cakes from 2012.

2012 was an interesting year. It was the year of Pinterest...you may have heard of it. Pinterest brought about many trends in the cakes. When people described the cake they wanted I heard words like, ombre, vintage, ruffles, antiqued, owls. So here are just a few Pinterest inspired cakes.

Ruffle cakes... I have literally made ruffles until my little fingers want to fall off. :)


Ombre...the first time I heard this word, I had NO idea what my customer was saying. Now, I am all too familiar with "Ombre." 


Vintage, and antique are two more words that have shown up in descriptions of cakes. This cake was so fun and I think it definitely has a "vintage" feel.


Unless you have been living under a rock...you have seen an owl this past year. This is one of my favorite owl cake designs. I love its whimsy.

 Along with Pinterest trends, here are some of my favorite cakes of 2012.

I love this cake, because it surprised me. At first I wasn't sure how the colors where going to work. I just wasn't excited about it. Then as I made it and completed it, I fell in love with it. 

I loved the flowers and colors on this cake. Very much my style.

This was for a cute lady who was celebrating being "cancer free." I loved how it turned out, but loved even more what it was representing. 

This cake taught me a new flower, the carnation, which I love.


I LOVE 3-D cakes. They challenge me, and that makes my job fun. 
Here are some of my favorite 3-D cakes of 2012.


My first armadillo cake. It was so much fun to make! And the bride and groom LOVED it!! 


The year of Zombies brought about a few Zombie inspired cakes. 
Loved making them and how they turned out!!!


This was by far my largest cake of 2012. I loved making it for Ebay.


I always love making cakes for my family. This was for my sweetheart Chris and his father. They are avid duck hunters and this celebrated their birthdays and the opening of duck season. People couldn't believe these were cakes...lol!


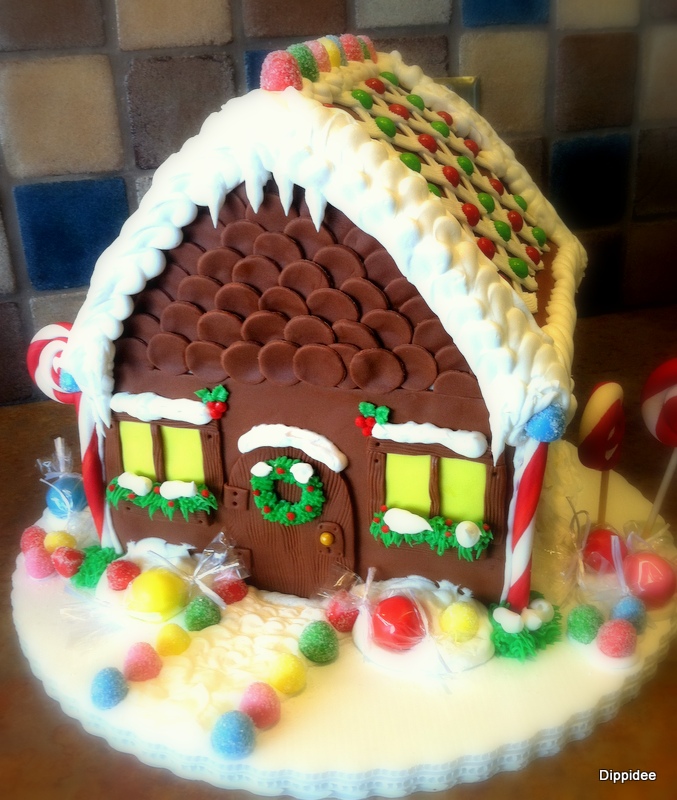
And lastly, my gingerbread house cake. Really loved how this turned out. 

Thank you all for making our 2012 AMAZING!!! We hope that we can continue to serve you and your family with our "sweet surprises." I am truly honored to be able to be a part of your lives through my creations. 


Thursday, December 13, 2012

Sweet Surprises


We hope your holiday season is wonderful. I just love this time of year. I love how everything transforms into this wonderful winter wonderland. This is such a fun time at Dippidee. Come in and see some of our beautiful creations. We have so many sweet surprises that are sure to help make your holidays sweeter.
Peppermint cupcakes

Peppermint Meltaways

Beautiful gifts for those on your Christmas list


Holiday Sugar Cookies

Chocolate Dipped Oreos

This is just a sneak peek of things we have to offer. So stop by or call in an order. And let Dippidee help make your holiday a sweet surprise.

Tuesday, December 11, 2012

NO NOT A GINGERBREAD HOUSE...

Confession, I don't like making gingerbread houses. Years ago I decided to be all cool and make a gingerbread house from scratch. I envisioned the most amazing gingerbread house. You know the one with towers, steeples, stained glass candy windows, candy brick path ways, sugary snow everywhere. It was going to be amazing... NOPE, it was a nightmare. Gingerbread isn't fun to bake, and definitely trying to get pieces to bake, that then need to connect..so not happening. I couldn't get the walls to hold together. Nothing connected. My royal icing was all wrong, it just ran everywhere. Stained glass candy windows...yeah right...what a joke. The whole experience was a disaster. Ever since this experience I just have it in my head that "I HATE MAKING GINGERBREAD HOUSES." When my kids want to make a gingerbread house, I buy the kit. You know the one you get at the grocery store. Yes, I own a bakery and I buy the gingerbread house kit.

Well today, I got to conquer my fear of the gingerbread house...well sorta...in my own way. I love working with cake. I am not intimidated by it at all. I will try to make anything using cake as my medium. I am sure you have seen some of my creations. So when one of our customers asked if we could make a gingerbread house out of cake...I was like...yeah, I can do that, even though "I HATE MAKING GINGERBREAD HOUSES."

Today was the day, and here is what I made...


I truly LOVED how it turned out. It was so fun to create this cute little house of sugar and sweets. After I was done, I wanted to move in. So throw me your challenge. I would LOVE to create a special cake for you. 
Love, Marcee

Friday, November 16, 2012

Thanksgiving Pie


I don't know if you were able to join me Monday November 12, 2012 on CW30 Daily Dish and ABC4 Good Things Utah, if not, here are the recipes I shared. You can also see the video of my appearance online. Click here for Dippidee's Foolproof Pie Dough and here for Laura's Old Fashioned Buttermilk/Chess Pie. And thanks for watching!

Dippidee’s Foolproof Pie Dough
2 1/2 cups (12 1/2 ounces) unbleached all-purpose flour
1 teaspoon table salt
2 tablespoons sugar
12 tablespoons (1 1/2 sticks) cold unsalted butter, cut into 1/4-inch slices
1/2 cup cold vegetable shortening, cut into 4 pieces
1/4 cup cold vodka
1/4 cup cold water
Process 1 1/2 cups flour, salt, and sugar in food processor until combined, about 2 one-second pulses. Add butter and shortening and process until a  dough starts to collect in uneven clumps, about 15 seconds (dough will resemble cottage cheese curds and there should be no uncoated flour). Scrape bowl with rubber spatula and redistribute dough evenly around processor blade. Add remaining cup flour and pulse until mixture is evenly distributed around bowl and mass of dough has been broken up, 4 to 6 quick pulses. Sprinkle vodka and water over mixture. Pulse a few times until dough is slightly tacky and sticks together. Dump dough from processor. Divide dough into two even balls and flatten each into 4-inch disk. Wrap each in plastic wrap and refrigerate at least 45 minutes or up to 2 days.
  

Laura’s Old Fashioned Buttermilk/Chess Pie
2 large pie shells, unbaked (See Dippidee’s Foolproof Pie Dough)
6 eggs
3 ¾ cup sugar
½ cup flour
Beat eggs. Mix flour and sugar together. Add to eggs. Mix until incorporated.
Melt one cup of butter. Add to egg mixture along with a pinch of salt, 1 Tblsp. vanilla and 2 cups buttermilk. Mix all together
Put filling in pie shell. Bake at 350 degrees for one hour.
 Makes 2 large pies.

Any questions about the recipes feel free to email me, Marcee@dippidee.com


Thursday, October 25, 2012

TV Appearance


This past Monday I did a Guest Chef appearance on CW30 Daily Dish and ABC4 Good Things Utah. It was a really fun experience, and I am so looking forward to being on each month. The following are the recipes I shared on my segment. The recipes are really easy, and taste really great. Both are perfect for the holidays. If you have any questions feel free to email me. Also, I will post the links to the video clips where you can see me make the items, that may help. Hope you enjoy! -Marcee

This is for the Creamy Caramel Apple Dip:


Creamy Caramel Apple Dip

Easy Homemade Salted Caramel Sauce (recipe below)
Marshmallow Cream Cheese Spread (recipe below)
5-8 Sliced Large Granny Smith Apples (soaked in ginger ale soda to prevent browning)

On a platter spread a nice layer of Marshmallow Cream Cheese Spread. Drizzle Easy Homemade Salted Caramel Sauce all over the cream cheese layer. Right before serving, put sliced apples all around the platter surrounding the cream cheese caramel dip. Serve.

Easy Homemade Salted Caramel Sauce

1 cup sugar
¼ teaspoon kosher salt
2 tablespoons corn syrup
2 tablespoons water
1/8 teaspoon lemon juice
1/2 cup hot heavy cream
1 tablespoon unsalted butter
1 teaspoon pure vanilla

Stir the sugar, 1/8  teaspoon kosher salt, corn syrup, water and lemon juice together in a 2-cup microwave-safe measuring cup or medium glass bowl. Microwave until the caramel is just barely starting to take on some color, 5-8 minutes (depending on your microwave). This is the point where you really need to have faith - don't be tempted to keep heating the caramel in the microwave until it is darker. 
Place the measuring cup on your counter and just let it sit undisturbed. Over the next few minutes the caramel will darken to a nice amber color.
In the meantime, if you haven't already, heat your cream in a microwave safe measuring cup or small glass bowl until it is hot, usually about 1-2 minutes. If you add cold cream to the caramel sauce it will seize up, and though you can fix it by setting it over low heat and stirring, it's easier to just start with hot cream.
Once the caramel reaches the right color, add the hot cream, a few tablespoons at a time. It will bubble up intensely, but it won't overflow. After you've added all of the cream, stir to incorporate then add the butter, vanilla and remaining kosher salt. Once the caramel cools you can store it in the refrigerator (it is good for a few weeks). Gently reheat it when you want to use it.

Cream Cheese Spread

1 8 ounce package cream cheese (softened)
1 large jar marshmallow fluff
1 teaspoon vanilla

In standing mixer beat cream cheese until smooth.  Add marshmallow fluff, beat until fluffy. Add vanilla, beat until incorporated.

Sliced Granny Smith Apples

Slice 5-8 large Granny Smith apples. Soak in ginger ale soda for ten minutes. This process keeps the apple slices from turning brown, and keeps the apples tasting like apples. Dry apples off and place on platter.


Pumpkin Cheesecake Caramel Trifle

Pumpkin Cake (recipe below)
No-Bake Cheesecake (recipe below)
Easy Homemade Salted Caramel Sauce (recipe below)
Fresh Whipped Cream (recipe below)
Ground cinnamon
Ground nutmeg

In a glass trifle dish layer pumpkin cake, cheesecake and caramel sauce until bowl is filled. Decorate the top with fresh whipped cream, cinnamon and nutmeg. Serve.

Pumpkin Cake
1 package yellow cake mix
1 can (15 ounce) pumpkin
1 Tbsp pumpkin pie spice
1 Tbsp vegetable oil

Preheat the oven to 350 degrees F. Generously grease a 9x13 inch baking pan.
In a large bowl, mix together the cake mix, canned pumpkin and pumpkin pie spice until well blended. Spread evenly into the prepared pan.
Bake for 25 to 30 minutes in the preheated oven, or until a knife inserted into the center comes out clean. Cool and serve, or store in the refrigerator.

No Bake Cheesecake
1 8 ounce package cream cheese (softened)
1 can sweetened condensed milk
¼ cup lemon juice
1 tsp pure vanilla

Beat softened cream cheese until smooth. Add sweetened condensed milk. Beat until smooth. Add ¼ cup of lemon juice, beat until smooth and starting to thicken. Add vanilla. Beat until incorporated, cheesecake will thicken as sets up.

Fresh Whipping Cream
1 cup heavy whipping cream
1/3 cup sugar
1 tsp pure vanilla

In large mixing bowl beat heavy whipping cream until stiff peaks form. Don’t overbeat…or you will have butter. Add sugar and vanilla. Beat until incorporated.

Thursday, September 13, 2012

Candy Buffet

Did you know that we do custom Candy Buffet's? Just another "Sweet Surprise" we offer.


Here is the pricing...

Sweet Surprise Mini Candy Buffet:
                $6.99/per person (minimum of 30 guests)
·         5 to 6 candy types;
·         custom tablescape design, linens (you can provide your own if you want);
·         container rental;
·         product scoops;
·         cello bags with ties;
·         staffing of buffet for duration of event;
·         set-up and take-down, local only (outside of service area is additional charge);
·         leftover candy is yours to keep!

Sweet Surprise Candy Buffet:
                $7.99/per person (minimum of 50 guests)
·         8 to 9 candy types;
·         custom tablescape design, linens (you can provide your own if you want);
·         container rental;
·         product scoops;
·         coordinating ribbon accents;
·         cello bags with ties;
·         personalized cello bag labels;
·         staffing of buffet for duration of event;
·         set-up and take-down, local only (outside of service area is additional charge);
·         leftover candy is yours to keep!

Sweet Surprise Ultimate Candy Buffet:
                $8.99/per person (minimum of 75 guests)
·         10 to 12 candy types;
·         custom tablescape design, linens (you can provide your own if you want);
·         container rental;
·         product scoops;
·         coordinating ribbon accents;
·         coordinating labels for jars;
·         cello bags with ties;
·         personalized cello bag labels;
·         staffing of buffet for duration of event;
·         set-up and take-down, local only (outside of service area is additional charge);
·         leftover candy is yours to keep!

Upgrades:
·         Personalized bag/box labels or tags;
·         coordinating ribbon accents;
·         coordinating labels for jars;
·         mini Chinese-style take-out containers;
·         cupcakes, cake pops, specialty candy and popcorn (ask for pricing).
For your information:
·         Our minimum number of servings is 30. We may be able to service a smaller party, but a surcharge will apply.
·         Each buffet display will include a minimum of six containers. Some candy may be duplicated to achieve desired visual effect.
·         Our standard service area includes American Fork and Lehi. We welcome events outside of this area but a delivery charge will apply.

Looking for something else? We can probably do it – just ask!

Thursday, August 9, 2012

Cake I LOVE!!!

Sometimes I get to work on a project or a cake that I just LOVE! This cake was one of those. I absolutely love the simplicity of this cake. But don't let the picture deceive you, this cake took a lot of time. All of the flowers were made by hand and carefully turned into a beautiful piece for this cake. So I wanted to share with all of you something that I enjoyed making.


Friday, July 27, 2012

What did you do this Summer?

Princess and the Pea Cake...Loved doing this cake. It was so fun to come up with a cute design and execute it. Can you spot the "Pea?"

Cars cake...I have made a few of these...this one I loved because I made each of the cars by hand instead of using toys. I LOVED how they turned out!

Superheros cakes...I have made more than a few of these this summer. I know far too much about the design of Iron Mans Mask, which colors are used for batman, spiderman, and superman, which superheros are part of the Avengers...and so on and so on.

Custom 40th Birthday Cake...This cake I was honored to do. This was for Rich who has been  battling cancer for quit some time. Rich's wife said it was a huge accomplishment that Rich made it to his 40th birthday and they wanted to go all out. The buttons on the side of the cake are custom buttons his family had made to help motivate him to fight.

It's been a summer of owls and birds. I have made some very fun cakes using this theme. Here are a couple.

Isn't this the cutest Owl? I love it!!

This was a really fun cake based on the Olivia book. Love the colors, and design. See the cute little roses?

Ghostbusters Cake...do you all remember this movie? Can you see Slimer on the side?

Olympic Cupcakes...I made these to be featured on Studio 5. They turned out really great       


So this is what I have been up to this Summer. Make sure you stop in and let us create a custom cake, cookies and or cupcakes for you!

Tuesday, July 17, 2012

It's a rocky road...

Have you been enjoying our month of cupcakes? We sure have. This week we have two wonderful cupcakes. The one shown is our Rocky Road. We chose this cupcake because it appropriately describes the road our pioneer ancestors had to travel. Our "Rocky Road" cupcake is of course much sweeter than the one they traveled. Our super moist chocolate cake is filled with marshmallow cream. Then we top it off with our amazing Rocky Road topping, chocolate ganache, marshmallows and walnuts. You will love the flavors this cupcake produces. Remember our weekly featured cupcakes are only $1.99/each. And checkout our Facebook page for this weeks other featured cupcake and another special cupcake deal.